How to make Sweet Somasi (with step by step pictures)
Weeks before Diwali, Mom & Grandma would start the preparations for Diwali. They would take out the largest containers in the house, to store the sweets & snacks; which would then be distributed to all neighbors, friends & family. Diwali was a mega celebration in my home - I used to look forward to it, even more than my birthday :)
The Somasi was only made for Diwali in our house. The filling by itself can be a snack; i had some left over luckily! The outer shell is crispy & not sweet; the inside is coated with the sweet filling & satisfies your sweet tooth. If you have the Somasi mould, it might save you some time; but if you don't, you can still make it successfully, like I did.
 with a easy filling.")
Ingredients:
Makes about 20 medium Sized Somasi's
For the filling:
1/2 Cup Roasted Gram (Chutney Dal) - Powdered
White Sugar - 3/4 Cup
Dry Grated Coconut flakes - 2 Tbsp (If using fresh grated coconut, dry roast until it's dry)
Khus-Khus - 1 Tbsp (Dry roasted)
Cardamom powder - 1/4 Tsp
Optional
Broken Cashews - 2 Tbsp roasted in 1 Tsp Ghee
Optional
Broken Cashews - 2 Tbsp roasted in 1 Tsp Ghee
For the shell:
All purpose flour/Maida - 1 Cup
Oil - 2 Tbsp
Salt - 1/4 Tsp
Water - Approximately 1/4 Cup (some extra water for sealing the shell)
Oil for deep frying

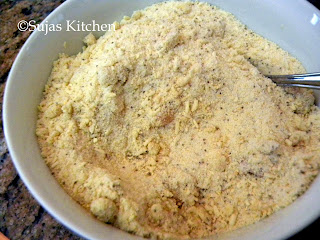
- Mix all the ingredients for the filling & set aside.


- Mix the salt & oil to the flour (you should be able to make a ball, by tightly squeezing it in your palm, to ensure that the oil is enough).

- Knead by adding water, little by little to get a stiff dough. Set aside for 15 minutes.

- Make a marble sized ball with the dough & spread it around with a rolling pin to make it as thin as possible (to get a crispy shell) into a small circle.
- Take a small amount of the filling & keep it on one half of the circle, making sure you leave more than a finger space around the edges.

- Keep water in a small bowl, next to you & smear a thin layer of water around the circumference & carefully seal the edges & press gently with your fingers to make a broad seal.

- If the edges are uneven & rough, you can trim it using a Somasi cutter or a pizza cutter or even a knife.

- If you like, you can crimp the edges using the back of a fork.

- Make all of the Somasi's by repeating Steps 4 through 8 and lay on a flat surface.

- Heat the oil in a kadai on medium heat for frying .
- Once the oil is hot enough, gently drop a few Somasi's in the oil & flip multiple times to ensure, it gets crispy on both sides.

Continue frying on medium heat, until the Somasi's get golden in color & you feel that it is hard & crispy with your laddle. Drain on absorbent paper & let it cool.


13. DO NOT close it while it's still warm. Let cool completely for couple of hours before storing it in an air-tight container.
Tips:
- Just before frying make sure you check the seal on every Somasi & reseal them with wet fingers if necessary.
- If it's not sealed properly, the filling might get into the oil & if it does happen, you will have to turn off the heat when that batch is done. Filter the oil & then fry the rest of the Somasi's so, you don't get blackened filling stuck on the shell of the Somasi.
- If you have any of the filling/powder leftover, You can use it to make a Payasam/Kheer with it.
No comments:
Post a Comment